
Contents
- Installing XAMPP
- Starting XAMPP
- Creating a Database and a MySQL User
- Installing MLInvoice
- Creating Database Tables
- Loggingn in to MLInvoice and Setting up Configuration
1. Installing XAMPP
- Download XAMPP installation package from http://www.apachefriends.org/
- Install XAMPP according to its documentation. These instructions assume XAMPP is installed into c:\xampp directory.
- If you install Apache and MySQL as services, you don't need to start them up manually when accessing MLInvoice. However, if you use MLInvoice rarely, having them up and running continuously uses up resources unnecessarily.
-
You can setup or remove the services also later in the XAMPP Control Panel with the Svc checkbox.
N.B.! For the installation or removal of services will work, the XAMPP Control Panel has to be started as an Administrator. This can be accomplished by right-clicking the icon and selecting "Run as an Administrator".
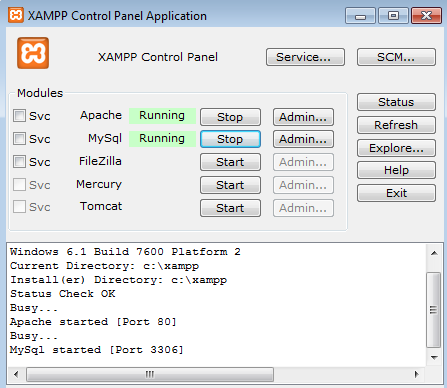
2. Starting XAMPP
-
Open up XAMPP Control Panel
N.B.! If the Control Panel is closed with the X of the window, it wil remain running in the notification area of Windows. It can be brought up again by clicking the icon in the notification area. - Start Apache
- If Windows Firewall is in use, it will probably ask at this point, whether to allow access to Apache from the network. If you use MLInvoice only on this computer, it is recommended to not allow the access. In this case MLInvoice can only be accessed on the computer it is installed on. This applies to other firewall software too.
- Start MySQL
- With MySQL it is recommended to disallow connections from network in any case.
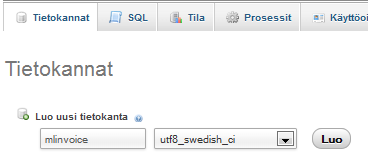
3. Creating a Database and a MySQL User
- Click the Admin... button at MySQL in the XAMPP Control Panel so that phpMyAdmin is opened in the browser.
- Create a new database
- Click Databases tab at the top
- Write mlinvoice in the Create database field
- Select a suitable utf8-based collation, e.g. utf8_swedish_ci for a typical Nordic sort order
- Click the Create button
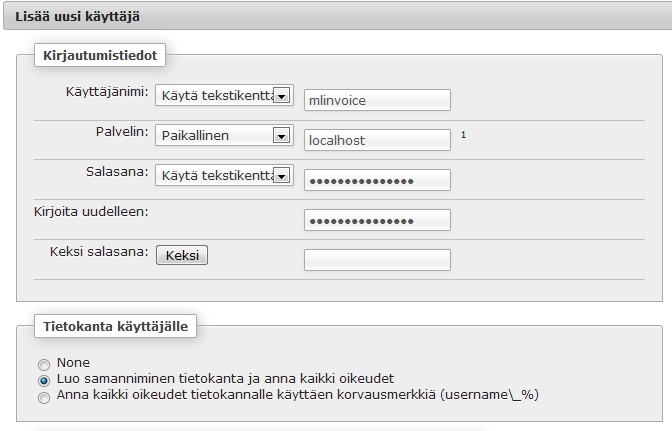
- Add a new user to the database
- Click the Privileges tab at the top
- Click Add user link
- Fill in the fields:
- User name: mlinvoice
- host: localhost (tai valitsepudotusvalikosta "paikallinen")
- Password and Re-type: something suitably complex here
- Database for user: Create database with same name and grant all privileges
- Leave Global privileges empty
- Click the Go button
4. Installing MLInvoice
Now that XAMPP has been prepared, MLInvoice can be installed.
- Download the installation package from the installation page
- Copy the mlinvoice-x.x.x folder from the installation package to c:\xampp\htdocs folder
- Rename the copied folder to mlinvoice
- Since Windows does not show file extensions by default, are the following operations to create the configuration file done in the command prompt.
- Open the Command Prompt (found in the Utilities)
- Enter the following commands:
c:
cd \xampp\htdocs\mlinvoice
copy config.php.sample config.php
write config.php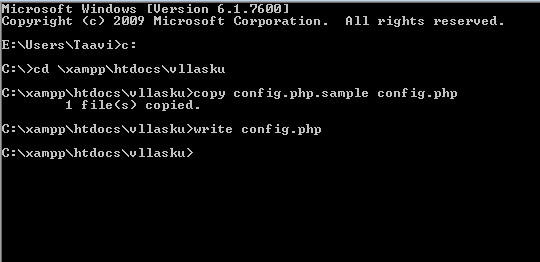
- After the last command MLInvoice config file is opened for editing.
-
Modify line:
and change it to the password for the user you created previously in phpMyAdminissa. This is required for MLInvoice to be able to access the MySQL database.
define('_DB_PASSWORD_', ''); - Other changes are not required, so save the file and close WordPad.
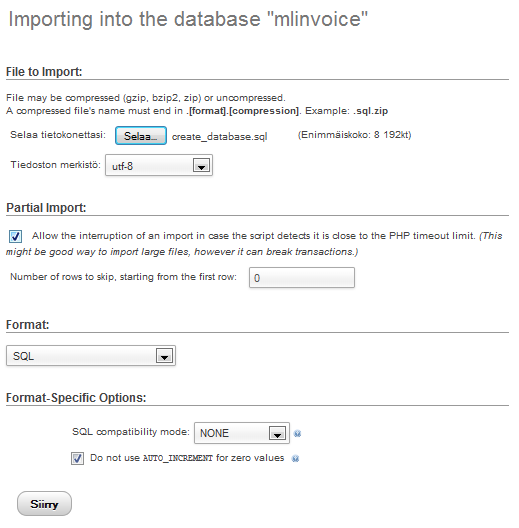
5. Creating Database Tables
Finally, the database tables need to be created.
- Go back to phpMyAdmin with the browser
- Click mlinvoice on the left column
- Click Import tab on the top
- Select file c:\xampp\htdocs\mlinvoice\create_database.sql using the button at "Browse your computer"
- Click the Go button
6. Logging in to MLInvoice and Setting up Configuration
.
- Open the address http://localhost/mlinvoice with the browser
- Log in with default credentials admin/admin
- IMPORTANT: Change admin user's password from System -> Users.
- Change the settings to suit your needs in Settings -> General Settings.
Keep in mind that Apache and MySQL must be running for MLInvoice to be accessible. If you did not set them up as services, they need to be started separately from the XAMPP Control Panel.